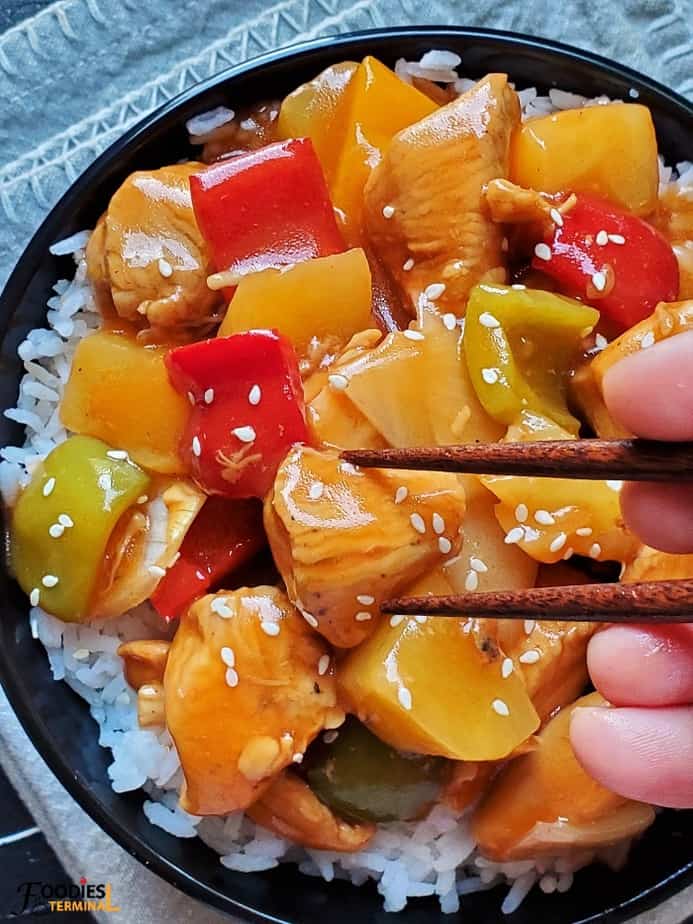
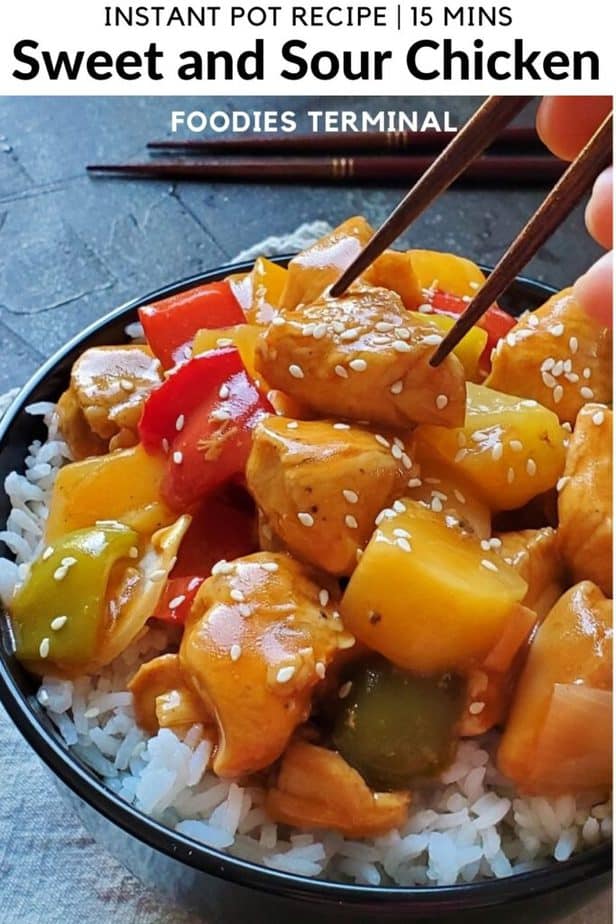
Instant Pot Sweet and Sour Chicken is a quick & healthy version of P.F.Chang's Sweet and Sour Chicken. It's all about the addictive Sweet and Sour chicken sauce that's loaded with pineapples, bell peppers & onion. This kids friendly recipe gets ready in just 15 mins.
Don't miss our huge collection of easy Instant Pot Recipes, Asian takeout recipes & Air Fryer Recipes!
Note: This post has been updated with better content, FAQs, storing ideas, serving ideas, reheating directions and better step by step instructions.
Healthy sweet and sour chicken
This easy Sweet and Sour Chicken is as delicious as this Instant Pot Mongolian Chicken. You'll love the finger licking good sauce that is sweet & sour, loaded with juicy pineapples, crunchy bell peppers and tender chicken.
If you love P.F.Chang's Sweet and Sour Chicken you'll totally love this pressure cooker version because it tastes just as good but is healthier. You won't get crispy fried chicken coated in sauce but we promise you, that, you won't miss them either.
You can use either boneless skinless chicken breasts or thighs to make this sweet and sour chicken with pineapple. A bowl of steamed jasmine rice will make it into a satisfying and complete meal.
What's Sweet and Sour Chicken?
Sweet and Sour Chicken is a favorite America-Chinese takeout dish that contains lightly breaded and deep fried chicken tossed in a sweet and tangy sauce along with bell peppers, onion and with or without pineapple.
However, today's Instant Pot Sweet and Sour Chicken is made with sautéed boneless chicken. There's no breading or deep frying involved. It's much healthier and contains so much less calories.
Ingredients
Find the Ingredients with actual measurements way below the post on the "Recipe Card". The list below is just a reference.
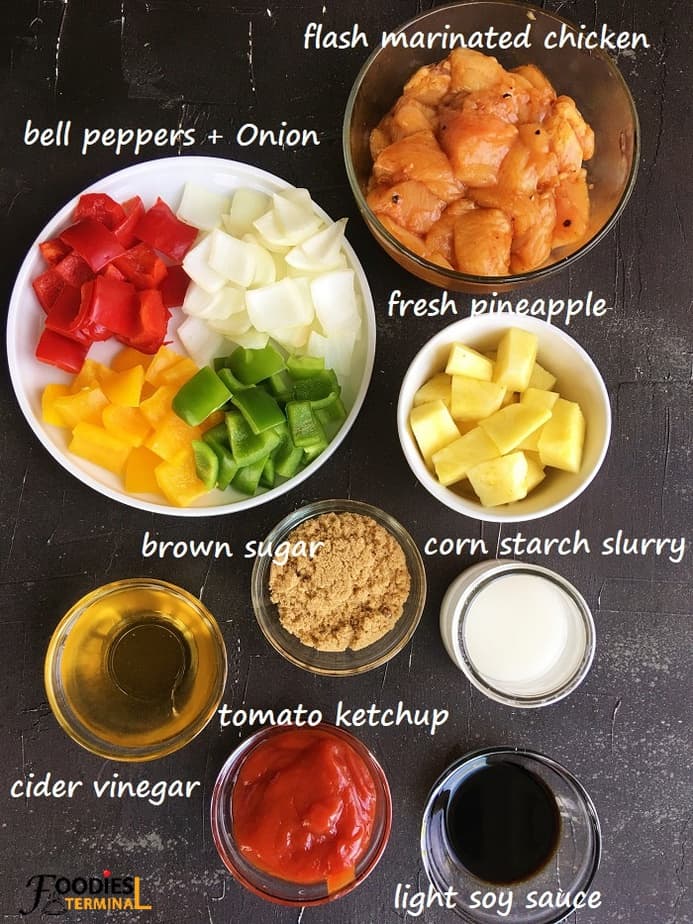
- Chicken: We used Organic boneless and skinless chicken breast. You can use chicken thighs as well. Dice the chicken into 1 inch chunks.
- Bell Peppers: We love bell peppers and used 3 colors - yellow, red and green. You can use whatever you have on hand.
- Yellow Onion: Don't use red onion, it will change the flavors of the dish and can make it overwhelming. Sweet white onion is also a good option.
- Sweet and Sour chicken Sauce: For the sauce you will need tomato ketchup, cider or rice wine vinegar, brown sugar, light soy sauce. If you love a slight kick you can add crushed red pepper flakes. However, this recipe contains none.
- For flash marinating the chicken: Light Soy Sauce, paprika, crushed black pepper and salt.
- Any neutral oil: Like canola, sunflower, vegetable oil or avocado oil or light or extra light olive oil.
Tips for success
- Saute Chicken: This will enhance the flavors manifold. As a result the recipe will taste much better than a dump and cook recipe. Saute the chicken until golden around the edges.
- Sweet and Sour Sauce: Everything boils down to this addictive sauce. We love a balanced flavor which is a little more sweet and not over overwhelmingly tangy. We added a little more brown sugar, but if you do not love sweet food feel free to adjust the sweetness according to your preference.
- What kind of pineapple to use? Either fresh or canned. We used fresh pineapple and hence cooked it along with the chicken. If you choose to use canned pineapple than strain the juices and add the chunks after pressure cooking the chicken, along with the bell-peppers and onion.
- Vinegar: Use either apple cider or rice wine vinegar for that restaurant quality depth of flavor.
- Ketchup secret: Use good quality ketchup. It'll create magic in the sauce.
- Veggies: Do not over cook the veggies, keep them crisp and crunchy. Never ever pressure cook them. They will become awfully mushy. The residual heat should be enough to cook down the veggies to the right texture.
- Thickening the sauce: Thicken the sauce by simmering it over LOW heat settings. You'll have a lovely sauce consistency after a few mins.
- How much to thicken the sauce? Well, we love a nice and thick sauce that beautifully coats the chicken. However, if you prefer a thin sauce simmer it less.
How to make Instant Pot Sweet and Sour Chicken?
Find the detailed step by step recipe along with measurements way below the post on the "Recipe Card".
Step #1 Saute Chicken
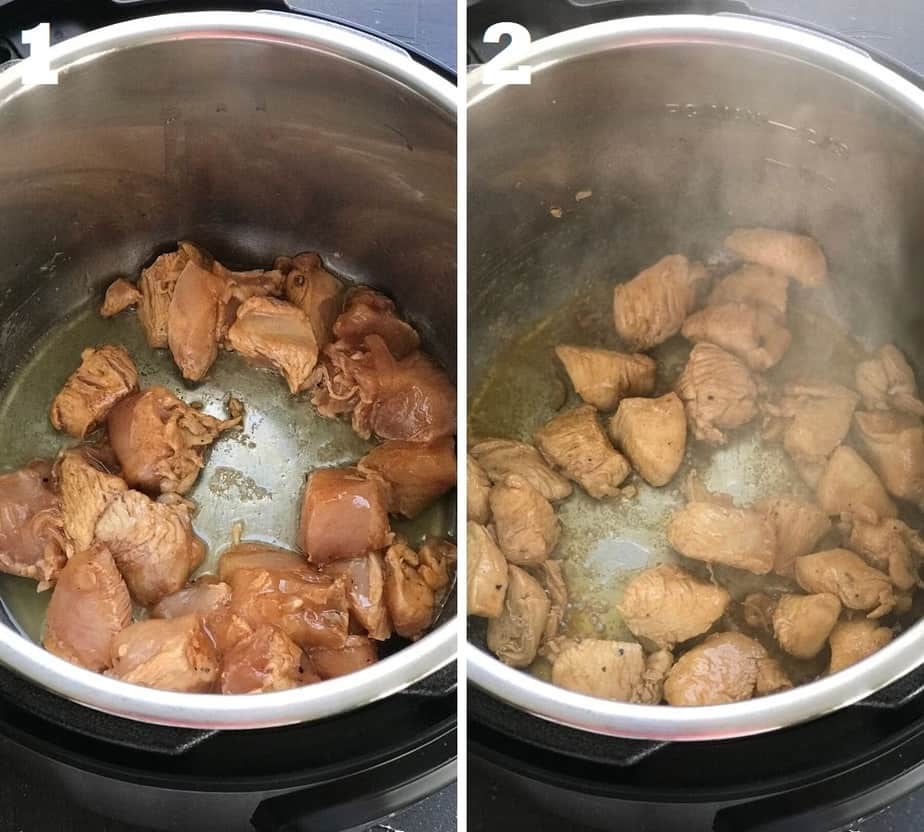
- Quick marination, saute chicken: Flash marinate the chicken with paprika, salt & light soy sauce and saute the chicken in your Instant Pot (SAUTE function, NORMAL settings) until they turn golden around the edges. This simple process makes a huge difference in the recipe and adds tons of good flavors.
Step #2 Pressure cook chicken
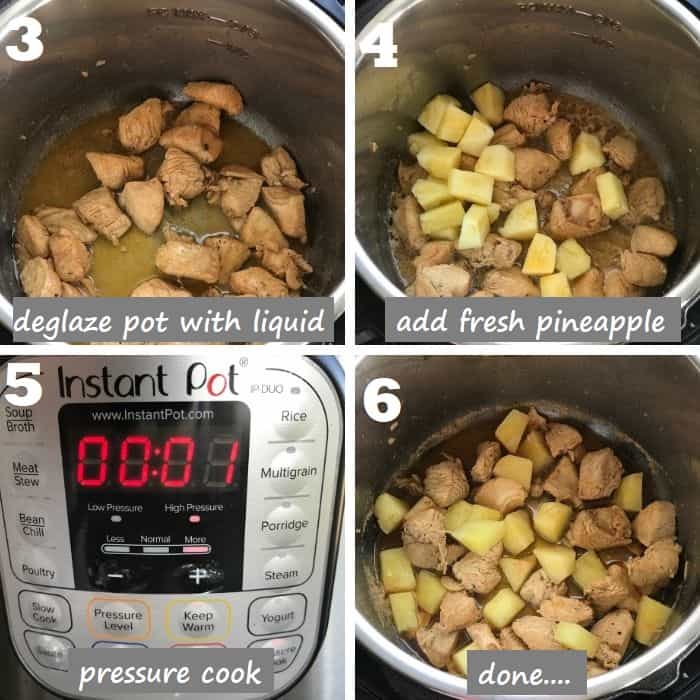
- Deglaze pot: Add water and de-glaze the pot very well with the help of a spatula by scraping the sides and the bottom of the pot. This will help loosen any stuck food particles stuck at the bottom of the pot and will help prevent the BURN error.
- Pressure cook: If using fresh pineapple chunks add them now and PRESSURE COOK on HIGH for just 1 min (for organic farm fresh chicken) and for 3 mins for regular chicken. After a QUICK PRESSURE RELEASE (QPR) open the lid of the pot.
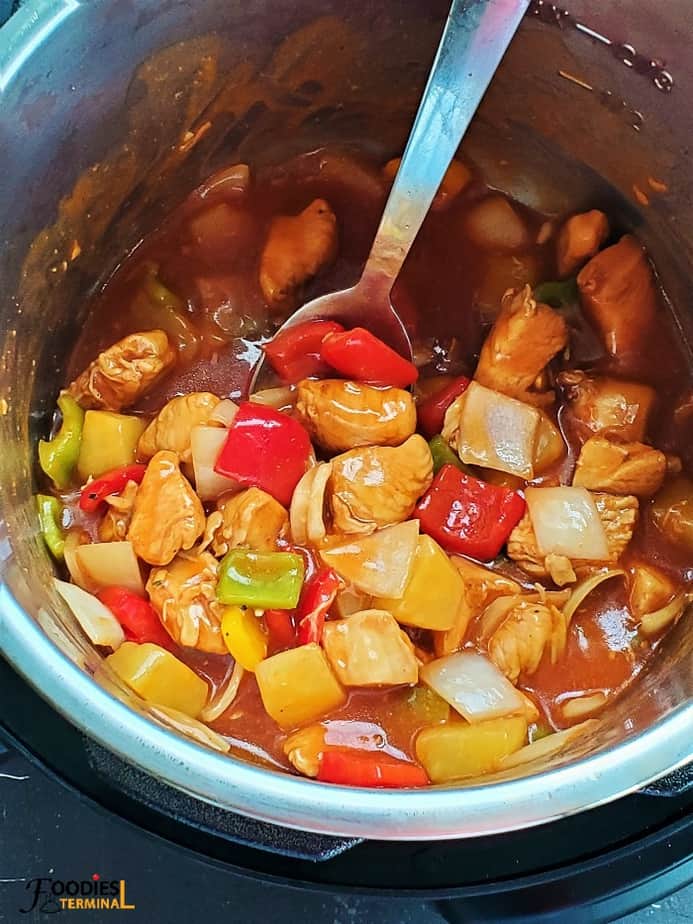
Step #3 Add sauces, thicken sauce, add veggies
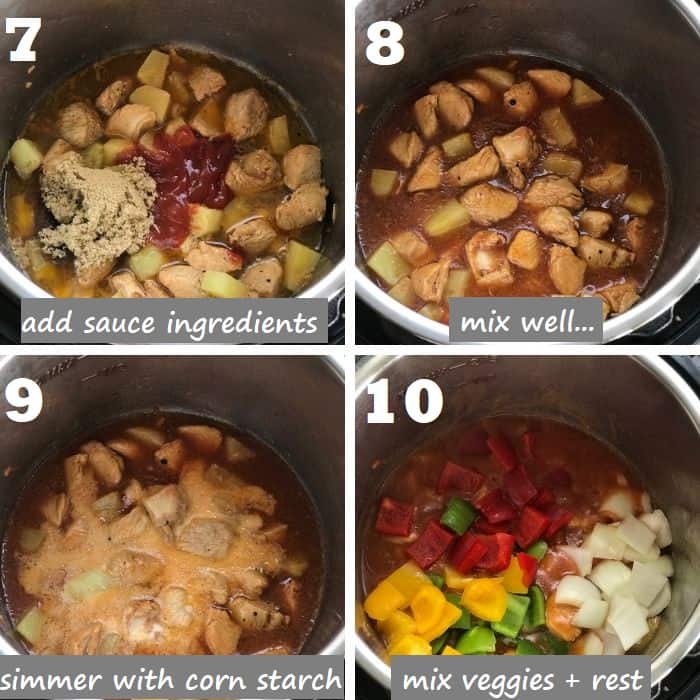
- Make sweet & sour sauce: Add the sauce ingredients and mix well with the rest of the ingredients in the pot. Hit the SAUTE function and keep it at LOW.
- Thicken sauce: Add the cornstarch slurry and simmer the sauce until it thickens. Add the veggies and mix everything together. Turn off the Instant Pot.
Step #4 Rest and serve
- Serve Chinese sweet & sour chicken: Cover the Instant Pot with a lid and allow the Sweet and Sour Chicken to rest for just 2-3 mins. The residual heat will help cook down the veggies to a perfect crisp texture. Serve and enjoy!
Serving Ideas
Sweet and sour chicken is often served with steamed Jasmine rice or noodles to balance out the sweetness and tanginess of the sauce. Here are some of the popular options that you can serve with Chinese sweet and sour chicken:
- Chicken fried rice.
- Hibachi fried rice: This cooked rice dish has all the incredible flavors of your favorite Japanese Hibachi restaurant.
- Chili garlic noodles: Who doesn't like a bowl of mildly spicy garlicky noodles! The sweet and sour chicken goes very well with this garlicky noodles.
- Lo mein: Can't beat the flavors of Lo mein. It tastes heavenly when mixed and eaten with this healthy sweet and sour chicken recipe.
- Stir fried vegetables.
- Egg roll: These crispy and savory rolls stuffed with vegetables and protein of your choice can make a great appetizer or side dish to compliment your sweet and sour chicken.
- Spring Rolls: These lighter and healthier rolls made with gluten free rice paper and filled with vegetables, shrimp, chicken or tofu can also be a great side.
- Steamed or pan fried Dumplings: These bite-sized dumplings filled with pork, chicken, shrimp or vegetables and served with soy sauce or dipping sauce can add some variety and fun to your meal.
Storing Tips
- Fridge: This Instant Pot Sweet and Sour Chicken will last for 5 days in the fridge when stored in air tight containers.
- Can you freeze Sweet and Sour Chicken? Yes, you can freeze sweet and sour chicken for up to 2 months. However, the bell peppers will lose the crispness and will turn soft and limp when the dish is thawed and re-heated.
Reheating directions
- Microwave oven: Reheat the sweet and sour chicken in the microwave oven until warm or hot.
- Stove top: You can also reheat the chicken in a skillet on the stove top set on medium high heat. Stir often until warm or hot.
FAQs
The key difference between sweet and sour chicken and General Tso's chicken is that sweet and sour chicken is coated in a sweet and tangy sauce. Whereas, General Tso's chicken is coated in a spicy and savory sauce. Sweet and sour chicken is not very spicy whereas, General Tso's chicken can range from mildly spicy to very spicy depending on the recipe and the restaurant. Sweet and sour chicken is a dish that has been popular in China for many years, while General Tso's chicken is a Chinese-American dish that was invented in the United States in the 1970s.
Sweet and sour sauce is sweet and tangy at the same time. It's not spicy.
The best way to eat sweet and sour chicken is to serve it with fried rice, steamed rice or noodles. Side dishes and appetizers like dumplings, potstickers, egg rolls, spring rolls, stir fry veggies also go very well with sweet and sour chicken.
Chicken breasts are lean cuts of meat that can quickly become dry and tough if overcooked. The Instant Pot cooks food quickly and efficiently, so it's important to be mindful of the cooking time. If you cook the chicken breast for too long, it can become rubbery. Try reducing the cooking time by a few minutes and checking the chicken's internal temperature to ensure that it's fully cooked. Lack of enough cooking liquid can also make the chicken breast rubbery in the instant pot. Make sure to follow the recipe's instructions for liquid and use enough to cover the chicken.
More Asian take-out recipes you might like
- Instant pot pork lo mein.
- Instant pot chicken lettuce wraps.
- Instant pot drunken noodles.
- Authentic chicken lo mein recipe.
- Instant pot ramen stir fry.
- Instant pot pad Thai.
- Instant pot shrimp and broccoli.
- Thai peanut chicken instant pot.
- Instant pot sweet and sour pork.
- Instant pot egg roll in a bowl.
- Instant pot cashew chicken.
- Instant pot sweet and sour meatballs.
- Instant pot chicken teriyaki.
- Instant pot stir fry shrimp.
- Instant pot orange chicken.
- Instant pot Mongolian chicken.
Recommended


I LOVE HEARING FROM YOU! If you try this instant pot sweet and sour chicken recipe, please let me know! Leave a comment and rate it below. I would love to hear how it turned out for you, or any changes you make. You can also follow me on Pinterest or subscribe our free NEWLETTER for new recipes every week!

Instant Pot Sweet and Sour Chicken
Print Recipe Pin RateWatch Recipe Video
Ingredients
- 1 pound boneless skinless chicken breasts diced into 1" chunks (453 g)
- ½ cup green bell pepper made into ½ inch squares
- ½ cup red bell pepper made into ½ inch squares
- ½ cup yellow bell pepper made into ½ inch squares
- 1 cup fresh pineapple diced into ½ inch chunks (or canned pineapple drained)
- ½ cup onion diced into ½ inch squares and petals separated (use yellow or white onion)
- 2 tbsp cornstarch (diluted with 4 tbsp water)
- 3 tbsp Avocado oil (or use any neutral oil)
- ¼ cup water (Read NOTES below)
For Flash Marinating Chicken
- ½ tbsp light soy sauce
- ¼ tsp Paprika
- ¼ tsp Ground Black Pepper
- Salt (to taste)
For Sweet and Sour Sauce
- ½ cup brown sugar (you can add more sugar if you prefer very sweet sauce)
- ½ cup Tomato Ketchup
- ⅓ cup cider vinegar or rice vinegar
- 1 tbsp light soy sauce
Instructions
Quick marination, saute chicken
- Flash marinate the chicken with the ingredients listed above in the "For Flash Marinating" chicken section. **Read NOTES BELOW.
- Set the Instant Pot on SAUTE and set it on NORMAL. Add oil and when the oil becomes moderately hot add the marinated chicken and saute until they are nicely golden around the edges.
Deglaze pot
- Add water & also diced fresh pineapple chunks and de-glaze the pot very well so that there are absolutely no bits and crumbs stuck at the bottom of the pot. This will prevent the BURN error.
Pressure cook
- CANCEL the SAUTE function. PRESSURE COOK on HIGH for 1 min if using farm fresh ORGANIC CHICKEN and in case of normal chicken set the time for 3 mins.
- Once the pressure cooking cycle is over the Instant Pot will begin to beep. Immediately do a quick pressure release by moving the valve manually from the SEALING to the VENTING position. Open the lid carefully and add all the sauce ingredients like the brown sugar, ketchup & vinegar. Give everything a good mix.
Thicken sauce
- Press the SAUTE function and keep it on LOW.Add the corn starch slurry and mix well. Simmer the sauce until it thickens. It takes roughly 2-3 mins for the sauce to thicken beautifully. You can adjust the consistency of the sauce according to your preference. Simmer less for a slightly thin sauce.
Add veggies, Serve
- Add the soy sauce, the bell peppers and the onion (read notes below for tender onions) and mix everything very well. Turn off the Instant Pot and cover the pot with a lid. Rest for 4-5 mins. The residual heat will help cook the bell peppers and the onion and you'll have them crisp tender at the end. If you prefer softer well cooked veggies read notes below. Serve hot with rice or noodles. Enjoy!
Notes
- Measuring units used, 1 cup = 240 ml & 1 teaspoon = 5 ml.
- What is flash marination? Flash marination is a quick marination. You marinate the chicken and allow it to rest until you prep the other ingredients.
- Chicken: You can also use boneless skinless chicken thighs instead of chicken breasts.
- Crisp Tender Veggies + Onion: Today's recipe will reward you with just that.
- Love well cooked soft onions & Veggies? Pressure cook the Onions with the chicken and add the bell peppers while simmering the sauce to make them tender but not completely mushy. Allow the dish to rest for 4-5 mins covered, as the recipe suggests. We would not recommend pressure cooking the bell peppers because they will become mushy.
- Avoid BURN error in your Instant pot by de-glazing the pot very well with the help of a spatula. There should not be any bits and crumbs stuck at the bottom of the pot.
- Sweet and Sour Sauce: If you prefer really sweet sauce you can always increase the amount of brown sugar in the recipe.
- Sauce Consistency: We love a thicker sauce that beautifully coats each and every piece of chicken. If you prefer a slightly thinner sauce simmer the sauce a bit less.
- Fresh Diced Pineapple Chunks: Add them before pressure cooking the chicken and pressure cook them together.
- Want to use canned pineapple? Add them along with the other veggies.
- Water: If using canned pineapple you can sub the water in the recipe with the canned pineapple juice.
- For a slight heat in the recipe you may add crushed red pepper flakes. We didn't add any.


Gina Scott says
Very tasty! I am very pleased!
Foodies Terminal says
Hey Gina so glad you enjoyed the recipe so much 🙂 thanks a lot for such a wonderful feedback, totally appreciate it 🙂 - Meghna xoxo
KLT says
Just made. Love! Used frozen pineapple.Next time might add a little heat.Yummy.
Foodies Terminal says
Hey KLT! Thanks so much for the amazing feedback, appreciate it! So glad that you enjoyed the recipe. Extra heat is super for those you prefer spicy food...so yum! Hope you try our other recipes as well and thank a lot for stopping by! Take care... Meghna.xoxo
Deanna says
Thanks for the recipe! It turned out fantastic! My only issue is that mine turned out with ALOT of juice from the chicken, in addition to the sauce. I used boneless chicken breasts. I only added 1/4c of pineapple juice (I used canned pineapple), and followed the recipe for the sauce. Any idea where I might have gone wrong?
Foodies Terminal says
Hey Deanna, so glad to know that you enjoyed the recipe 🙂 Thanks so much for the wonderful feedback and for giving the recipe a try! Let me just ask you - did you add the water in addition to the pineapple juice? If yes, than from next time I would skip adding the water if adding pineapple juice. And if you did not add any water in addition to the pineapple juice than the problem is the chicken believe me! It happens to me a lot of times, sometimes chicken releases a lot of juices and makes the dish watery, sometimes the chicken doesn't release a bit of water! The juices released from the chicken cannot be controlled, because it's tough to make out which chicken will release juices and which ones won't. From my experience I found that organic chicken doesn't release a lot of juices as compared to the regular variey. The only way you can fix the issue is by simmering and cooking down the sauce. Or you can also try this and see if it works - instead of adding 1/4 cup liquid add just 2 tbsp and see it works for you 🙂 Hope it helps Deanna! Let me know if I answered your question 🙂 Hope you also try other recipes from this blog and enjoy making them. Take care Deanna 🙂 - Meghna XOXO.
Sue says
This turned out really good. However your recipe doesn’t mention when to put the pineapple in. I put it in with the vegetables. I think next time I will add broccoli, finely sliced carrots and snow peas instead of 3 different peppers. I actually had to pressure cook it for zero minutes because the peppers were still hard. I also added fresh ginger and garlic to the sauce.
Foodies Terminal says
Awesome Sue! So glad you enjoyed the recipe. Thanks much for your lovely feedback.
Bonnie says
Very good; wasn’t necessary to even pressure cook
Foodies Terminal says
Thanks Bonnie for trying it out 🙂 Keep coming back for more such great recipes 🙂 - Meghna.